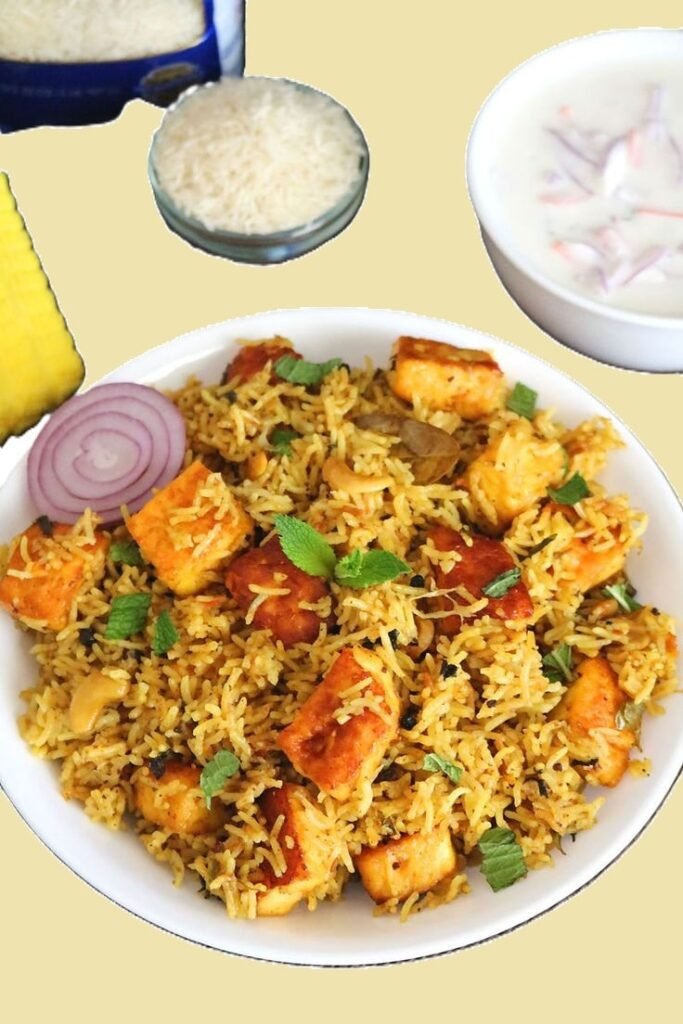
How to make Paneer Biryani
Get Ready to Party! Let’s Dive Headfirst into the Delicious World of Paneer Biryani! 🎉
Okay, folks, buckle up because we’re about to embark on a culinary adventure that’s guaranteed to tantalize your taste buds, impress your friends and family, and maybe even make you the reigning Biryani Royalty in your neighborhood! That’s right, we’re talking about PANEER BIRYANI!
Forget everything you think you know about “boring” vegetarian food. This isn’t your average veggie dish. Paneer Biryani is a symphony of flavors, a textural masterpiece, and a visual delight all rolled into one fragrant and utterly irresistible package. It’s the kind of meal that makes you close your eyes and savor every single morsel. Trust me, once you try this, you’ll be saying, “Chicken who?”
So, grab your apron, sharpen your knives (figuratively, of course, we don’t want any accidents!), and let’s get started! I’m going to walk you through every single step, from prepping the ingredients to that glorious first bite. Get ready for a flavor explosion that’ll have you dancing in the kitchen! 💃🕺
How to make Paneer Biryani | Best Paneer Biryani Recipe
Why Paneer Biryani is THE BOMB:
Before we dive into the nitty-gritty, let’s talk about why Paneer Biryani is so fantastic:
- Vegetarian Heaven: Obviously, it’s a fantastic option for vegetarians and those looking to incorporate more plant-based meals into their diet.
- Flavor Powerhouse: The combination of aromatic spices, creamy paneer, and fluffy rice is simply divine. It’s a complex and satisfying flavor profile that will leave you wanting more.
- Impressive Presentation: Biryani is naturally a visually stunning dish. The layers of colorful vegetables, golden-brown paneer, and fragrant rice make it a showstopper at any dinner table.
- Perfect for Any Occasion: Whether it’s a cozy weeknight dinner or a celebratory feast, Paneer Biryani is always a crowd-pleaser.
- Customizable Goodness: You can easily adapt this recipe to your liking by adding your favorite vegetables, adjusting the spice level, and using different types of rice. The possibilities are endless!

The Essential Ingredients: Assemble Your Flavor Army!
Alright, let’s gather our troops! Here’s what you’ll need to create this masterpiece:
- Basmati Rice (2 cups): This is crucial! Basmati rice has a beautiful aroma and cooks up perfectly fluffy, which is essential for a good Biryani. Make sure to rinse it thoroughly until the water runs clear to remove excess starch.
- Paneer (250g): The star of the show! Use good-quality, fresh paneer. You can use store-bought or make your own if you’re feeling ambitious! Cut it into cubes – not too small, not too big, just right!
- Onions (2 large): Thinly sliced. Trust me, the more the merrier! Caramelized onions add a beautiful sweetness and depth of flavor.
- Tomatoes (2 medium): Finely chopped. They contribute to the rich and flavorful gravy.
- Ginger-Garlic Paste (2 tablespoons): The dynamic duo! Freshly made is always best, but store-bought works too.
- Green Chilies (2-3): Adjust to your spice preference. Finely chopped.
- Mint Leaves (1/2 cup): Freshly chopped. Adds a refreshing aroma and flavor.
- Coriander Leaves (1/2 cup): Freshly chopped. Another burst of freshness!
- Ghee/Oil (4 tablespoons): Ghee adds a rich, nutty flavor that’s hard to beat, but vegetable oil works perfectly fine too.
- Yogurt (1/2 cup): Plain, full-fat yogurt is best. It tenderizes the paneer and adds a creamy tang.
- Lemon Juice (1 tablespoon): Adds a bright, acidic touch.
- Rose Water (1 teaspoon) – Optional but HIGHLY recommended! A little goes a long way in adding a delicate floral aroma.
- Saffron Strands (a pinch): Soak in 2 tablespoons of warm milk. This is what gives the Biryani its signature golden hue and subtle flavor.
- Whole Spices:
- Bay Leaf (2)
- Cinnamon Stick (1 inch)
- Cloves (4-5)
- Cardamom Pods (4-5) – Slightly crush them to release their aroma!
- Black Peppercorns (5-6)
- Ground Spices:
- Turmeric Powder (1/2 teaspoon)
- Red Chili Powder (1 teaspoon) – Adjust to your spice preference!
- Coriander Powder (2 teaspoons)
- Cumin Powder (1 teaspoon)
- Garam Masala (1 teaspoon)
- Biryani Masala (1 tablespoon) – If you have it! It’s a great shortcut for extra flavor.
- Salt: To taste.
The Step-by-Step Biryani Bliss: Let’s Cook!
Okay, now for the fun part! Let’s break down the process into manageable steps:
1. Marinate the Paneer: Flavor Infusion Time!
- In a bowl, combine the paneer cubes, yogurt, turmeric powder, red chili powder, coriander powder, cumin powder, ginger-garlic paste, lemon juice, and salt.
- Mix everything well, ensuring the paneer is coated evenly.
- Cover and refrigerate for at least 30 minutes. The longer, the better! This allows the paneer to absorb all those delicious flavors.
2. Parboil the Rice: Fluffy Goodness Begins!
- Bring a large pot of water to a boil. Add a bay leaf, cinnamon stick, cloves, cardamom pods, black peppercorns, and salt.
- Add the rinsed Basmati rice and cook for about 5-7 minutes, or until the rice is about 80% cooked. It should still be slightly firm to the touch.
- Drain the rice in a colander and spread it out on a baking sheet to prevent it from sticking together.
3. Caramelize the Onions: Sweetness is Key!
- Heat ghee/oil in a large, heavy-bottomed pot or Dutch oven over medium heat.
- Add the thinly sliced onions and sauté them until they turn golden brown and caramelized. This takes time and patience, but it’s SO worth it! Don’t rush it!
- Remove about half of the caramelized onions and set them aside for garnish.
4. Prepare the Biryani Gravy: Flavor Explosion Incoming!
- In the same pot (with the remaining caramelized onions), add the ginger-garlic paste and sauté for a minute until fragrant.
- Add the chopped tomatoes and cook until they soften and the oil starts to separate.
- Add the remaining ground spices (turmeric powder, red chili powder, coriander powder, cumin powder, garam masala, and Biryani masala, if using) and sauté for another minute until fragrant. Be careful not to burn the spices! Add a splash of water if needed.
- Add the marinated paneer and cook for about 5-7 minutes, stirring gently, until the paneer is lightly browned.
5. Layer the Biryani: The Art of Assembly!
This is where the magic happens! We’re going to layer the rice and paneer gravy to create that signature Biryani look and flavor.
- Layer 1: Spread about half of the parboiled rice evenly over the paneer gravy in the pot.
- Layer 2: Sprinkle half of the chopped mint leaves, coriander leaves, and caramelized onions over the rice.
- Layer 3: Spread the remaining rice evenly over the herbs and onions.
- Layer 4: Sprinkle the remaining mint leaves, coriander leaves, and caramelized onions over the rice.
- The Final Touch: Drizzle the saffron milk over the top layer of rice. Sprinkle with a few drops of rose water (if using).
6. Dum Cooking: The Secret to Perfection!
This is the most crucial step! “Dum” cooking means cooking over low heat in a sealed pot, allowing the flavors to meld together beautifully.
- Seal the Pot: Cover the pot tightly with a lid. To ensure a good seal, you can use a piece of aluminum foil or a damp cloth between the pot and the lid.
- Low Heat Cooking: Place the pot over very low heat for about 20-25 minutes. You can also place a flat griddle or tava under the pot to prevent it from burning.
- Resting Time: After 20-25 minutes, turn off the heat and let the Biryani rest for another 10-15 minutes without opening the lid. This allows the steam to settle and the flavors to fully develop.
7. Serve and ENJOY! 🎉🎉🎉
- Gently fluff the Biryani with a fork before serving. Be careful not to break the rice grains.
- Garnish with extra mint and coriander leaves, if desired.
- Serve hot with raita (yogurt dip), papadums (crispy lentil wafers), and your favorite chutney.
Tips and Tricks for Biryani Brilliance:
- Rice Matters: Use good-quality Basmati rice for the best results.
- Don’t Overcook the Rice: Parboiling the rice is key. It should still be slightly firm to the touch before layering.
- Caramelize Those Onions: Seriously, don’t skip this step. It adds so much flavor!
- Don’t Be Shy with the Spices: Biryani is all about the flavors! Adjust the spice level to your liking.
- The Dum is Key: Low and slow is the way to go!
- Patience is a Virtue: Resist the urge to open the lid during the dum cooking process.
Variations and Customizations: Make It Your Own!
- Add Vegetables: Feel free to add your favorite vegetables, such as carrots, peas, beans, and potatoes.
- Spice it Up: Increase the amount of green chilies or red chili powder for a spicier Biryani.
- Use Different Types of Rice: While Basmati is the traditional choice, you can experiment with other types of rice, such as Sella rice or Jeera rice.
- Add Nuts: Cashews and almonds make a great addition to Paneer Biryani.
- Make it Vegan: Substitute the ghee with vegetable oil and use plant-based yogurt and paneer alternatives.
So, there you have it! A comprehensive guide to making the most delicious, flavorful, and impressive Paneer Biryani you’ve ever tasted! Now go forth, conquer your kitchen, and create a Biryani masterpiece that will have everyone singing your praises! Don’t forget to share your culinary triumphs with me! Happy cooking! 💖